|
HOSTING CONTROLLER 8 MANUALS :: Reseller |
|

|
HOSTING CONTROLLER 8 MANUALS :: Reseller |
|
To manage SharePoint Server:
Click the Tools menu under the Toolbox section.
Click the SharePoint submenu.
Selecting SharePoint opens following screen:
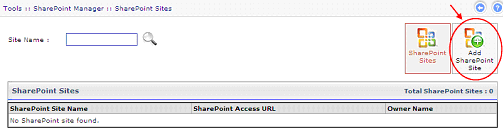
NOTE: Prior to add a SharePoint Site, make sure you have created a domain under which the SharePoint sites are going to be created.
You can see, currently, there is no SharePoint site added. Select “Add SharePoint Site” to add a SharePoint Site. It opens following screen:
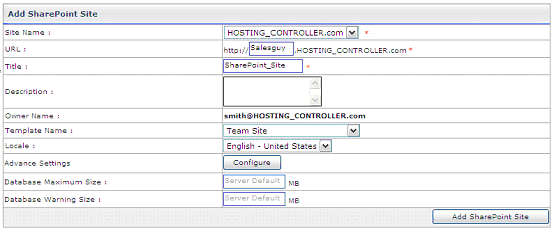
Site Name:
It is the domain name under which SharePoint sites are created. Select
your required domain from the list. All the SharePoint users have this
domain in their UserPrincipalName in Active Directory like user@domain.com
and are kept in an Organizational Unit in Active Directory with the path:
ADDomain\Hosting\Reseller\Domain.com
URL:
It is the URL of the site being created.
Title:
Specify title of the SharePoint Site being added.
Description:
Specify brief description regarding the SharePoint Site.
Owner Name:
It shows the owner name of this website being created. It is always
the web admin of the domain, under which this SharePoint site is being
created.
Template Name:
Select your required skin/template from the list for the site, you
are going to add.
Locale:
Select required locale from the list. It defines user’s language.
Advance Settings:
It shows further more options as:
• Database Maximum Size:
Either specify maximum size for the database
in this field or leave it as “Server Default” to assign default value
to this field.
• Database Warning Size:
Specify maximum size for the database, to send a warning to the user when the database size reaches the specified limit. To assign default value to this field, leave it as “Server Default”.
Select “Add SharePoint Site”. It adds the site with the specified information. You can add multiple SharePoint Sites by following the steps stated above.